
Tips for Making Delicious Homemade Pasta Salad
Are you craving a refreshing and satisfying dish for your next meal? Look no further than homemade pasta salad. In this guide, we’ll share expert tips and tricks for creating a mouthwatering pasta salad that will delight your taste buds. Let’s go in and discover how to make the perfect homemade pasta salad every time.
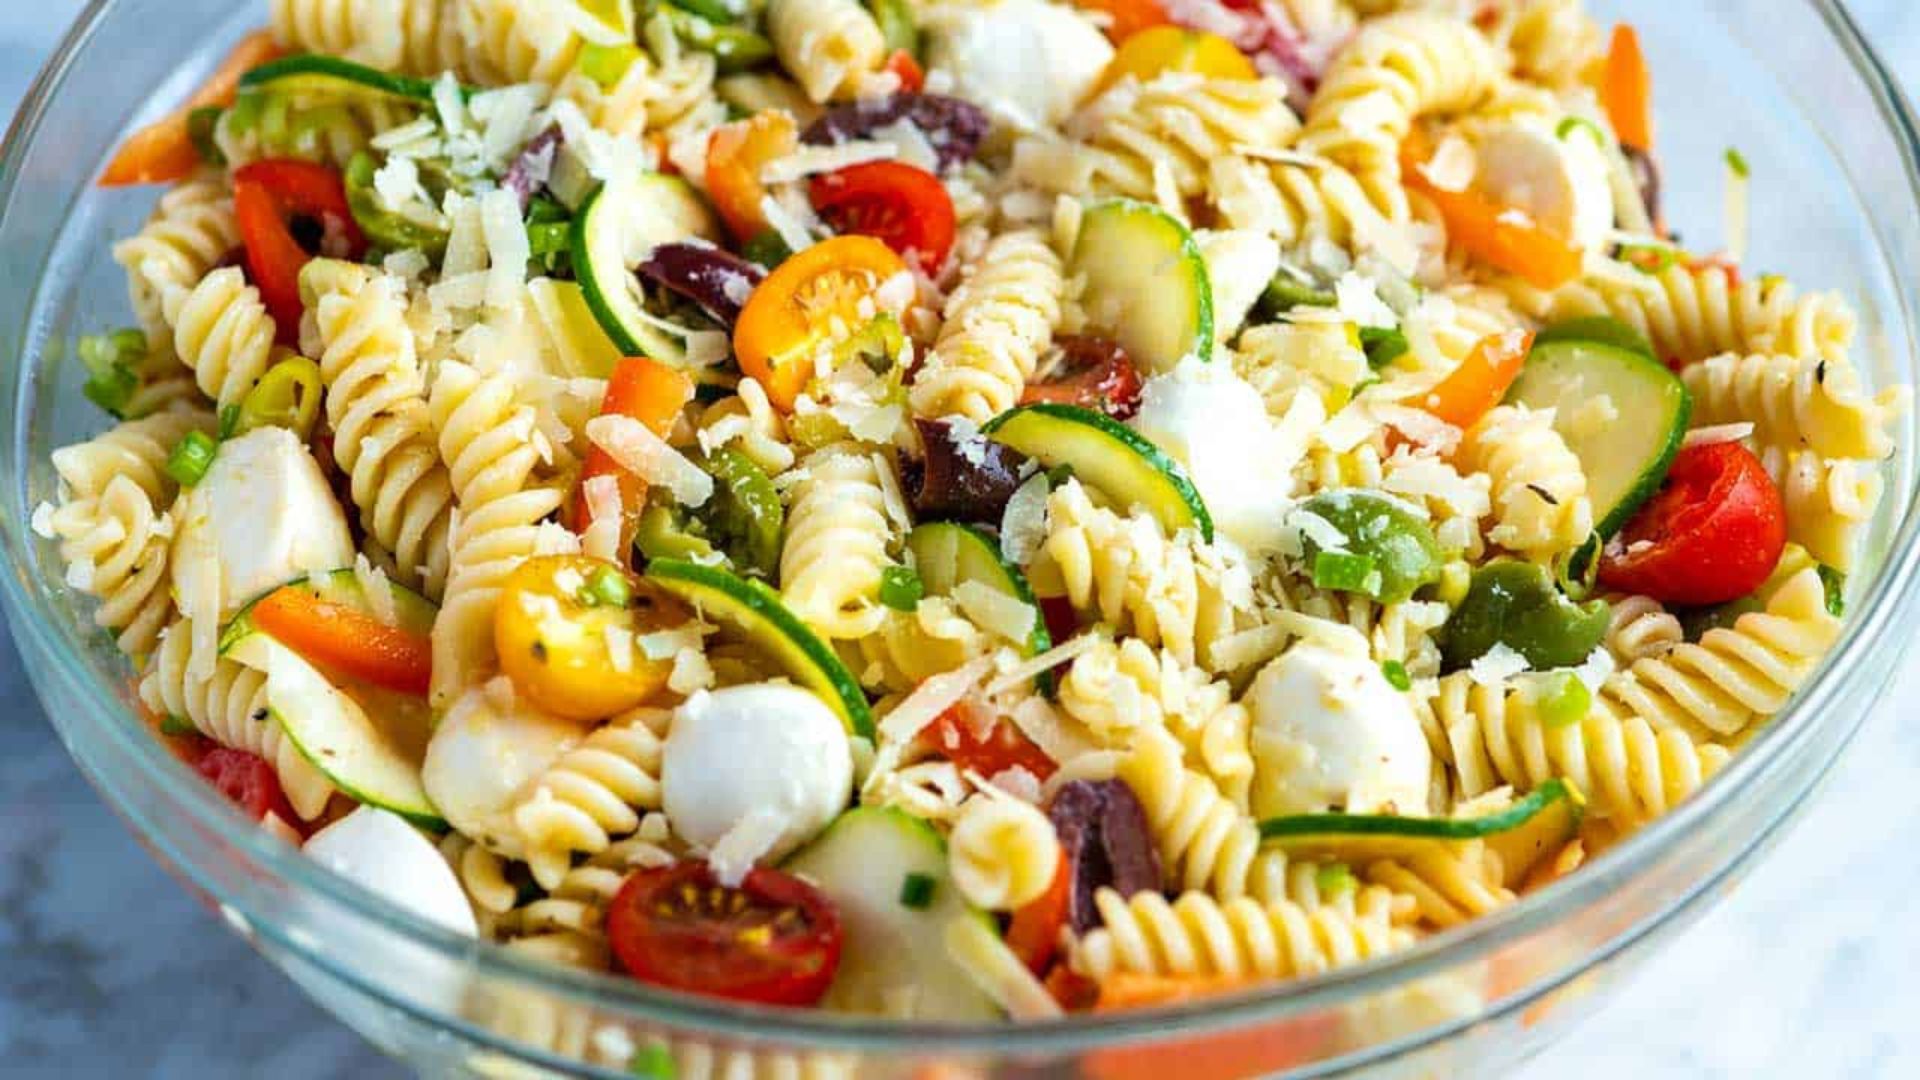
Choosing the Right Pasta
The foundation of any great pasta salad is, of course, the pasta itself. When making homemade pasta salad, it’s essential to choose the right type of pasta. Opt for sturdy shapes like fusilli, penne, or rotini that can hold up well to the other ingredients and dressing. These shapes have nooks and crannies that can capture the dressing, ensuring maximum flavour in every bite.
Cooking the Pasta
Achieving the perfect texture for your pasta salad starts with cooking the pasta just right. When you cook pasta al dente, it retains a slight firmness, ensuring it won’t become mushy when mixed with other ingredients in the salad.
Rinsing and Cooling
After cooking the pasta, it’s essential to rinse it under cold water to stop the cooking process and prevent it from becoming overcooked. Rinsing also helps remove excess starch, which can cause the pasta to clump together. Once rinsed, drain the pasta thoroughly and transfer it to a large bowl to cool completely before adding other ingredients.
Choosing Fresh Ingredients
The key to a flavorful pasta salad is using fresh and vibrant ingredients. Load up your pasta salad with an array of colourful vegetables such as cherry tomatoes, bell peppers, cucumbers, and red onions. Fresh herbs like basil, parsley, or cilantro can add a burst of flavour and freshness to the salad. Feel free to get creative and incorporate any vegetables or herbs you have on hand.
Creating a Flavorful Dressing
A delicious dressing is what ties all the ingredients together in a pasta salad. For homemade pasta salad, consider making your dressing using simple ingredients like olive oil, vinegar, lemon juice, and seasonings. Experiment with different flavour combinations, such as classic Italian vinaigrette, creamy ranch, or tangy balsamic glaze, to find the perfect match for your salad.
Mixing and Chilling
Once you’ve prepared all the ingredients and dressing, it’s time to mix everything. For the best flavour, refrigerate the pasta salad for at least an hour before serving to allow the flavours to meld together and develop.
Serving and Enjoying
When it’s time to serve your homemade pasta salad, give it a final toss to redistribute the dressing and garnish with additional fresh herbs or grated cheese if desired. Serve the salad chilled as a refreshing side dish or add protein like grilled chicken, shrimp, or tofu to turn it into a satisfying main course. Enjoy your delicious homemade pasta salad with friends and family at your next gathering!
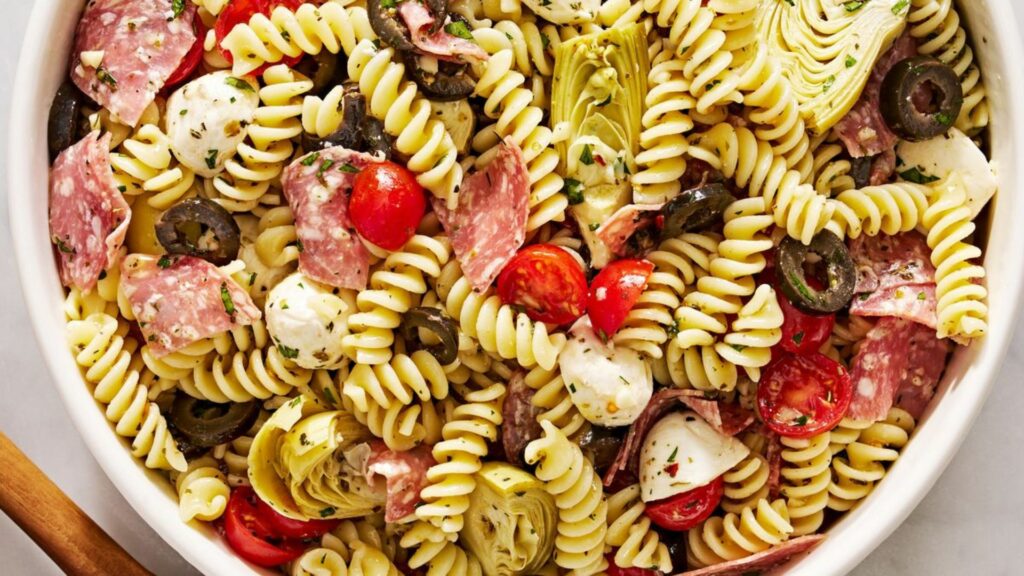
Adding Protein and Extras
To make your homemade pasta salad more hearty and satisfying, consider adding protein-rich ingredients and other extras. Grilled chicken, shrimp, or tofu are excellent options for adding protein to your salad. You can also include extras like diced ham, salami, or cheese for added flavour and texture. Be sure to adjust the seasoning and dressing accordingly to complement the additional ingredients.
Conclusion
With these simple tips and techniques, you can create a delicious homemade pasta salad that’s bursting with flavour and freshness. Experiment with different ingredients and dressings to customize your salad to your taste preferences. Whether you’re hosting a summer barbecue, potluck, or casual weeknight dinner, homemade pasta salad is sure to be a crowd-pleaser. So roll up your sleeves, get creative in the kitchen, and enjoy the satisfaction of making your pasta salad from scratch!
How to make the Perfect Baked Potatoes
Choosing the Right Potatoes
The first step in making the perfect baked potatoes is selecting the right type of potatoes. Typically, people make baked potatoes using russet potatoes, also known as Idaho or baking potatoes. These potatoes have a high starch content and thick skin, which helps them cook evenly and develop a fluffy texture on the inside.
Preparing the Potatoes
Before baking, it’s essential to properly prepare the potatoes. Start by washing the baked potatoes thoroughly under running water to remove any dirt or debris. Then, use a vegetable brush to scrub the skin clean. Once clean, pat the potatoes dry with a clean kitchen towel.
Pricking and Seasoning
To ensure even cooking and prevent the potatoes from bursting in the oven, use a fork to prick several holes into each potato. This allows steam to escape during baking. Next, lightly coat the potatoes with olive oil and sprinkle them generously with salt. The oil helps crisp up the skin during baking, while the salt enhances the flavour.
Baking the Potatoes
Preheat your oven to 400°F (200°C). Place the seasoned baked potatoes directly on the oven rack or a baking sheet lined with aluminium foil for easy cleanup. Bake the potatoes for approximately 45 to 60 minutes, depending on their size. To test for doneness, insert a fork into the centre of a potato. If it slides in easily and the potato feels soft, it’s ready.
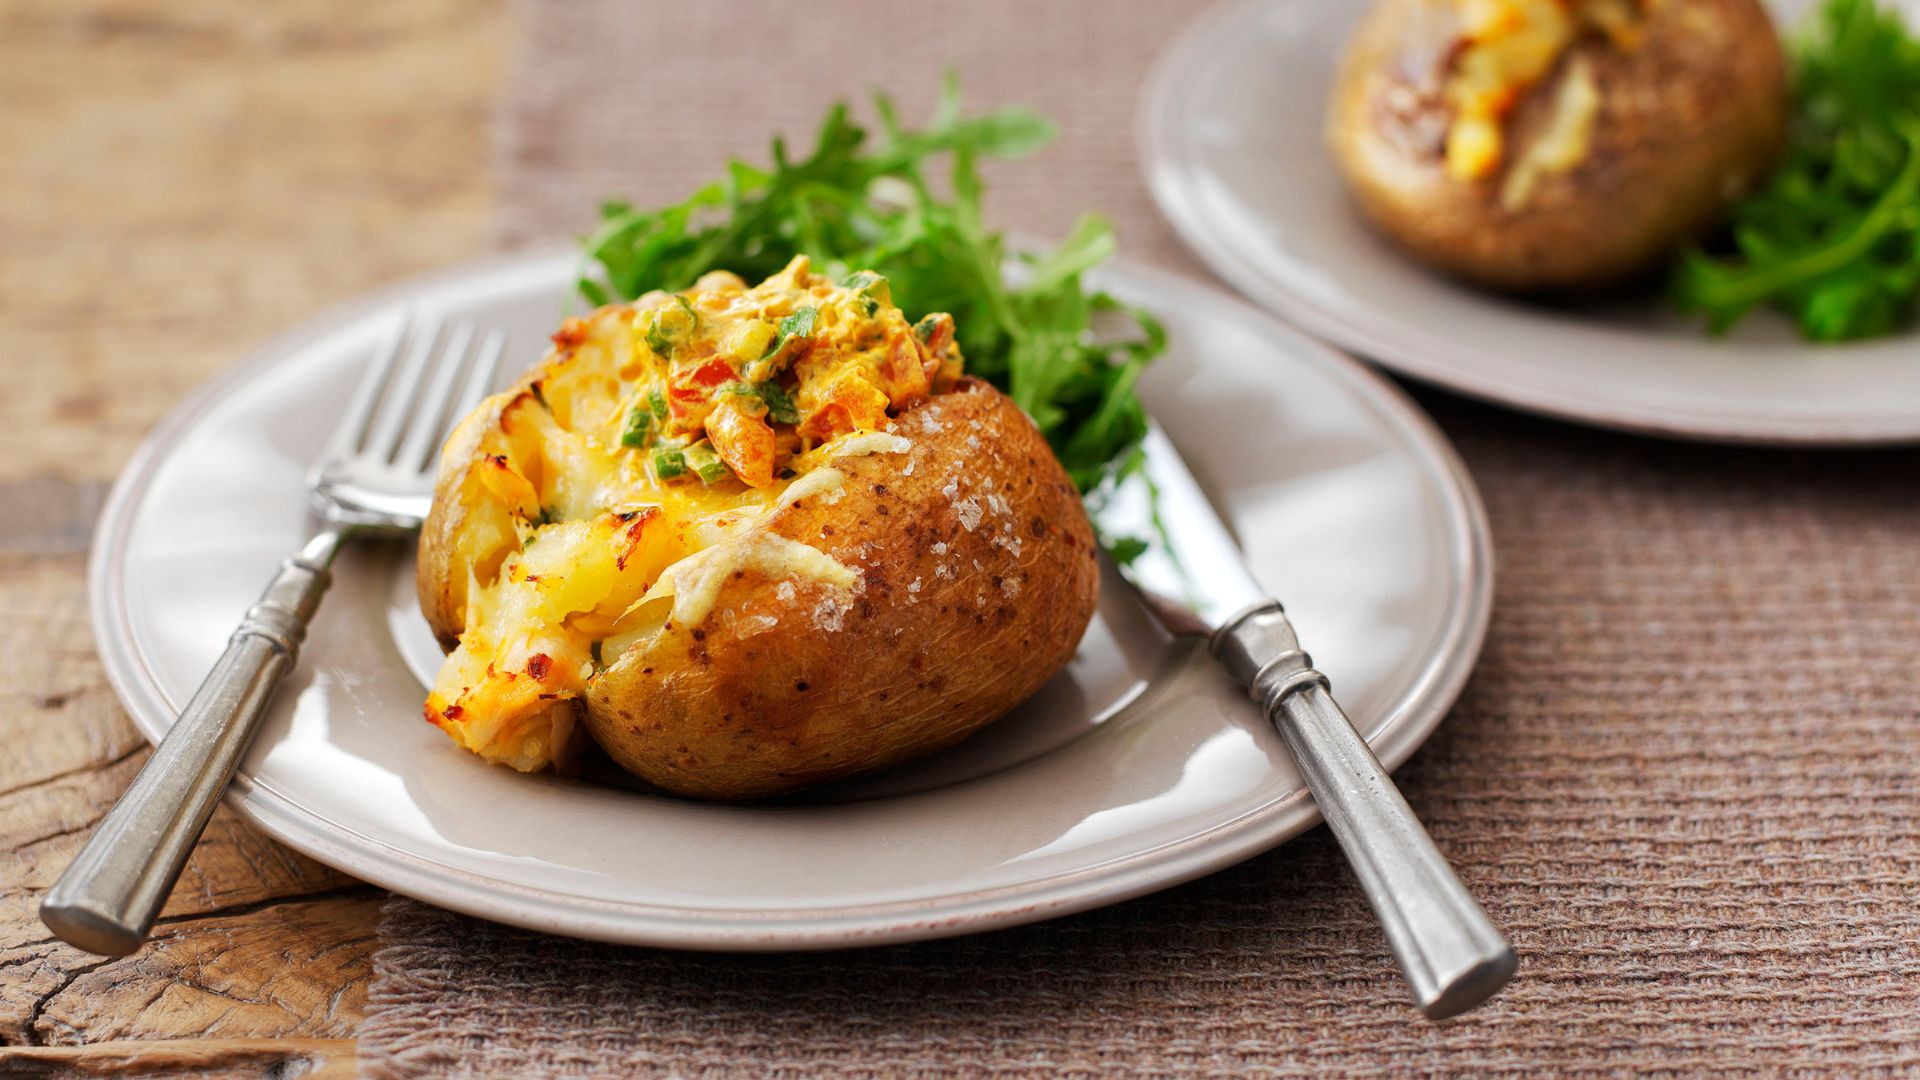
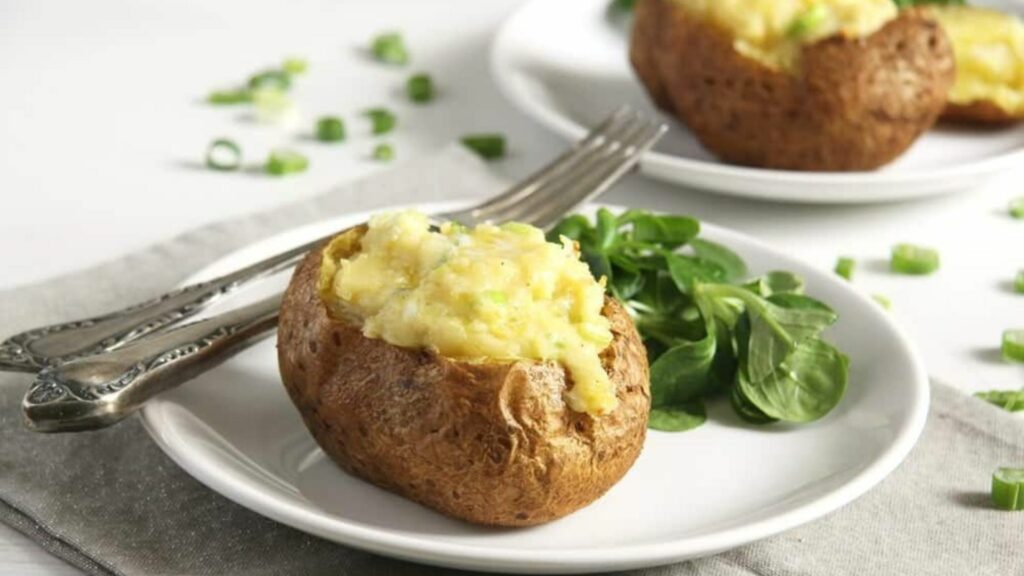
Optional Additions
While traditional baked potatoes are delicious on their own, you can elevate them with various toppings and fillings. Some popular options include butter, sour cream, grated cheese, chives, bacon bits, and chilli. Feel free to get creative and customize your potatoes to suit your taste preferences.
Serving and Enjoying
After the oven finishes baking the potatoes, remove them and allow them to cool for a few minutes before serving. To serve, use a sharp knife to make a lengthwise slit in the top of each potato, then gently squeeze the ends to open them up. Fluff the insides with a fork and add your desired toppings. Serve hot and enjoy the creamy, fluffy goodness of perfectly baked potatoes.
Seasoning Variation
While salt and olive oil are classic seasonings for baked potatoes, don’t be afraid to experiment with different flavours. Try rubbing the potatoes with garlic-infused olive oil or sprinkling them with a mixture of herbs and spices before baking. This adds an extra layer of flavour and elevates the taste of your potatoes.
Flavorful Fillings
Once you’ve cooked your baked potatoes to perfection, unleash your creativity by adding a range of delicious toppings. From classic choices like butter and sour cream to more adventurous options such as salsa, guacamole, or even pulled pork, the possibilities are endless. Experiment with different combinations to find your favourite flavour profiles and make each baked potato a culinary masterpiece.
Cooking Techniques
While baking potatoes in the oven is the most common method, there are other cooking techniques you can try to achieve different textures and flavours. For example, you can grill potatoes on a barbecue for a smoky flavour, or microwave them for a quick and easy meal. Experiment with different cooking methods to find your favourite way to enjoy potatoes.
Conclusion
In conclusion, mastering the art of making the perfect baked potatoes is simple with the right techniques and ingredients. By following these step-by-step instructions, you can create delicious and fluffy baked potatoes that will impress your family and friends. So, next time you’re planning a meal, consider adding baked potatoes to the menu for a comforting and satisfying dish.
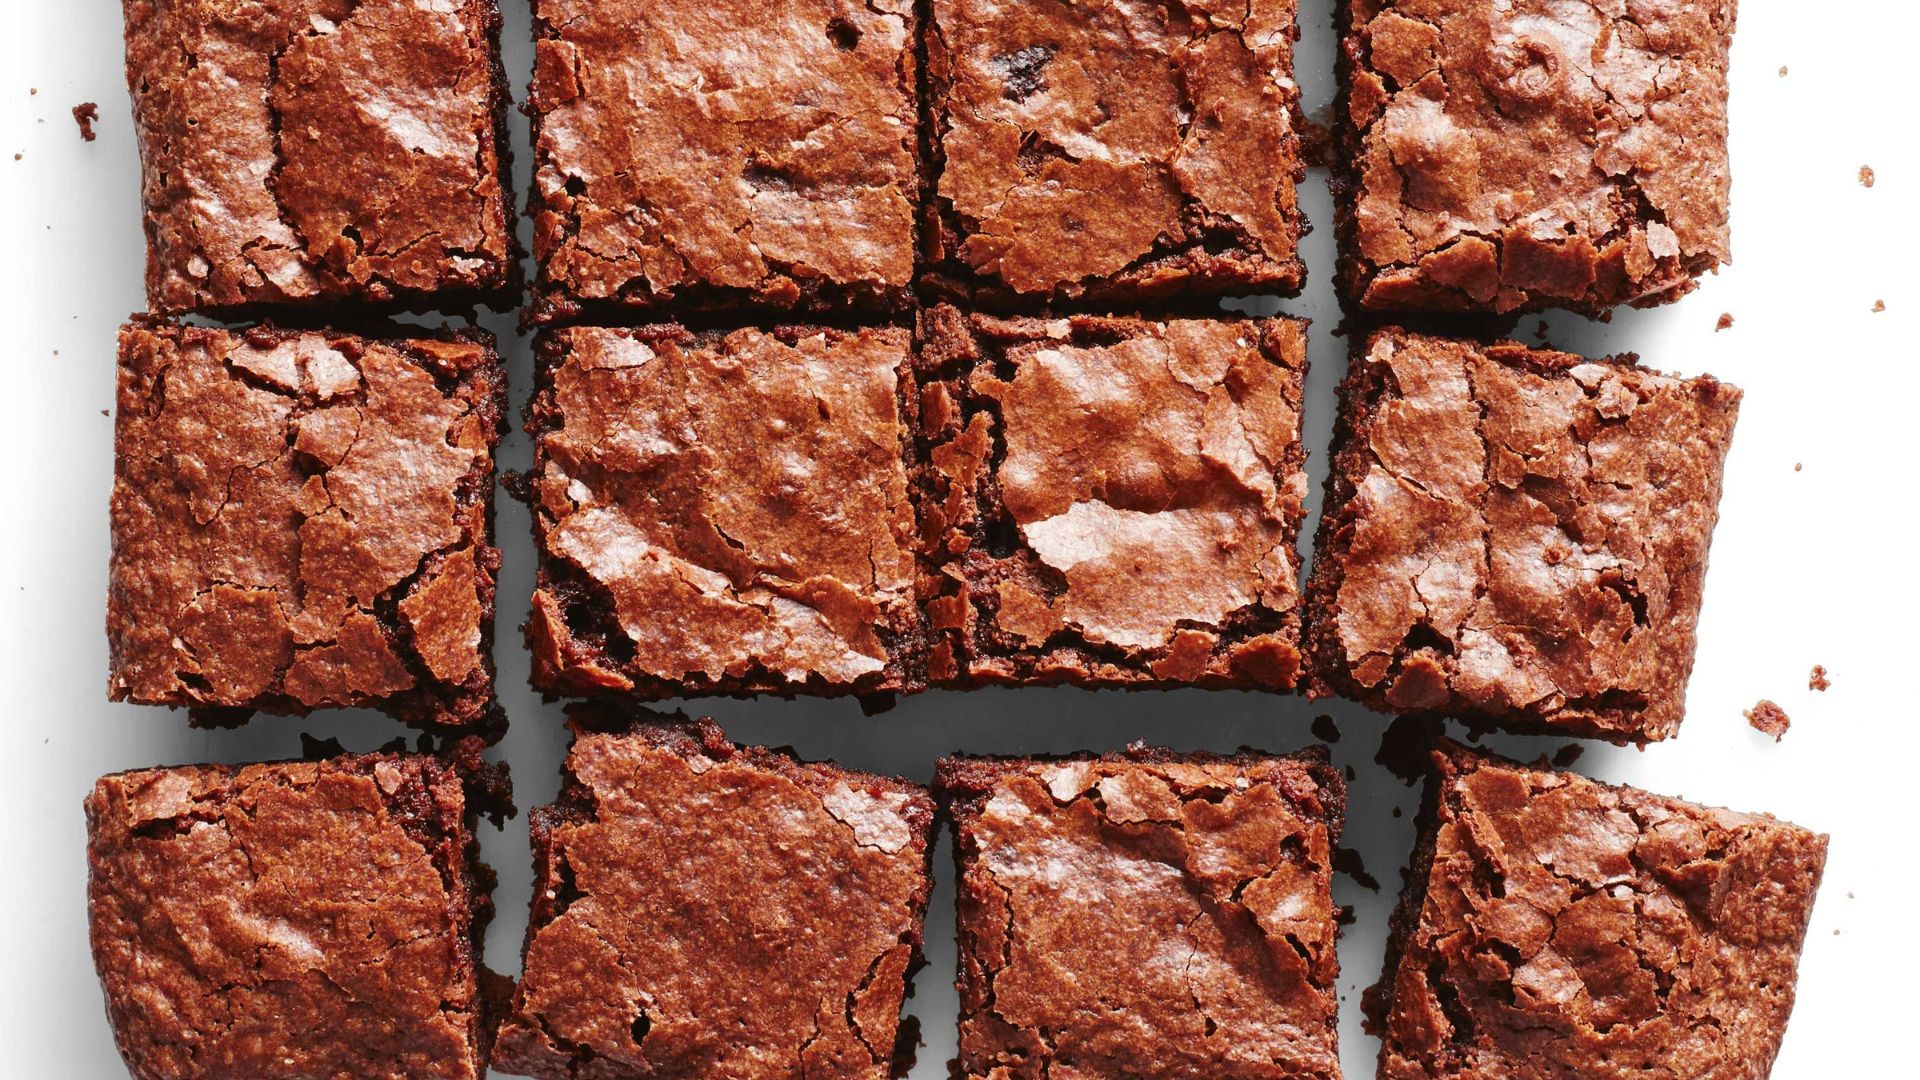
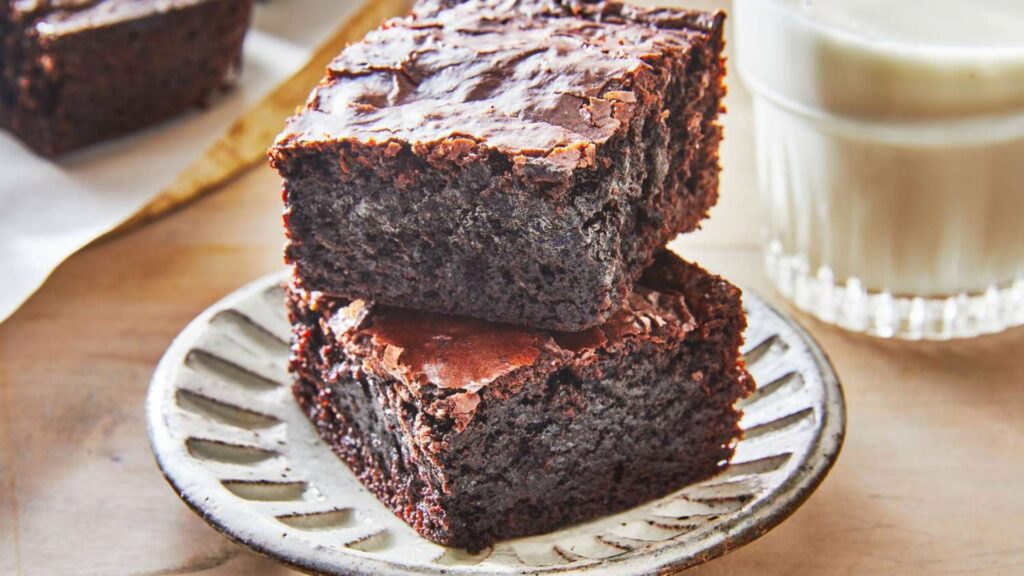
How to Bake Chewy and Delicious Chocolate Brownies
Indulge your sweet tooth and delight your taste buds with homemade chocolate brownies. In this guide, we’ll explore the step-by-step process of baking chewy and delicious chocolate brownies right in your kitchen.
Selecting the Ingredients
To begin your chocolate brownie journey, gather the necessary ingredients. You’ll need basic baking staples such as flour, sugar, eggs, and butter, along with high-quality cocoa powder and chocolate chips for that rich chocolatey flavour.
Preparing the Batter
Start by melting the butter and chocolate together in a saucepan over low heat, stirring until smooth and well combined. In a separate bowl, whisk together the eggs and sugar until light and fluffy. Slowly incorporate the melted chocolate mixture into the egg mixture, stirring until fully blended. Finally, sift in the flour and cocoa powder, folding gently until just combined. Avoid overmixing to maintain the desired chewy texture of the brownies.
While the chocolate mixture is melting, take a separate mixing bowl and whisk together the eggs and sugar until they are light and fluffy. This step incorporates air into the mixture, resulting in a lighter texture for the brownies. The sugar not only adds sweetness but also contributes to the chewiness and structure of the final product.
Baking the Brownies
While the oven is preheating, take the time to prepare your baking pan. Grease the bottom and sides of the pan with butter or cooking spray to prevent the brownies from sticking. Next, carefully pour the prepared brownie batter into the lined pan, using a spatula to spread it evenly into all corners and edges. Smooth the surface of the batter to ensure an even bake and uniform thickness throughout the brownies. For an extra touch of indulgence, sprinkle additional chocolate chips or chopped nuts on top of the batter before placing the pan in the oven.
Place the filled baking pan in the preheated oven and set the timer according to the recipe instructions or your preferred baking time. Avoid opening the oven door too frequently during baking. This can cause fluctuations in temperature and disrupt the baking process. Instead, rely on visual cues and use a toothpick or cake tester to check for doneness towards the end of the baking time.
Adding a Personal Touch
Enhance the flavour and texture of your chocolate brownies by incorporating additional ingredients. This includes nuts, chocolate chunks, or even a swirl of caramel or peanut butter. Sprinkle a handful of chocolate chips on top of the batter. You can do this before baking for a gooey chocolatey surprise in every bite.
Serving and Enjoying
After baking your chocolate brownies to perfection, it’s time to savour the fruits of your labour. Allow the brownies to cool slightly in the baking pan before transferring them to a wire rack to cool completely. This step ensures that the brownies maintain their shape and texture while cooling.
Once cooled, cut the brownies into squares or rectangles using a sharp knife. Depending on your preference, you can slice them into generous portions for a decadent dessert or smaller bites for a quick snack. The rich aroma of chocolate will fill the air as you cut through the fudgy layers of the brownies.
For an extra indulgent treat, serve the warm brownies with a scoop of creamy vanilla ice cream or a dollop of freshly whipped cream. The combination of warm, gooey brownies and cold, creamy ice cream creates a heavenly contrast of textures and temperatures that’s hard to resist.
Conclusion
In conclusion, baking chewy and delicious chocolate brownies is a delightful endeavour that brings joy to both the baker. And those fortunate enough to enjoy the final product. By following these simple steps and incorporating a few pro tips along the way, you can create brownies that are rich in flavour, moist in texture, and utterly irresistible.

How to Bake Crispy Homemade French Fries
Who doesn’t love the golden, crispy goodness of homemade french fries? In this guide, we’ll walk you through the process of making perfect french fries right in your kitchen. From selecting the right potatoes to mastering the frying technique, you’ll be whipping up batch after batch of irresistible fries in no time!
Choosing the Right Potatoes
The first step in making homemade french fries is selecting the right potatoes. Look for starchy varieties like Russet or Idaho potatoes, as they have a high starch content that results in a fluffy interior and crispy exterior when fried. Avoid waxy potatoes, as they tend to become soggy during frying.
Preparing the Potatoes
Once you’ve chosen your potatoes, it’s time to prepare them for frying. Start by washing and peeling the potatoes, then cut them into uniform-sized sticks or wedges. For classic french fries, aim for pieces that are about 1/4 to 1/2 inch thick. Pat the potato sticks dry with a paper towel to remove any excess moisture, which can cause the fries to steam instead of crisp up during frying. To ensure even cooking, it’s essential to cut the potatoes into uniform sticks or wedges. Aim for pieces that are approximately 1/4 to 1/2 inch thick, ensuring that they cook evenly and maintain their shape during frying.
Double-Frying Method
For the crispiest homemade french fries, employ the double-frying method. This technique involves frying the potatoes twice: first at a lower temperature to cook them through, and then at a higher temperature to achieve that coveted golden brown colour and crispy texture.
Benefits of Double-Frying
One of the primary advantages of double-frying is its ability to enhance the crispiness of the fries. The double-frying method not only affects the texture of the fries but also contributes to their flavour development. As the potatoes undergo two rounds of frying, they have more opportunities to absorb the flavours of the cooking oil and any seasonings used. This results in fries with a richer, more complex flavour profile compared to those cooked using a single-frying method. Another benefit of double-frying is the reduction of oil saturation in the final product. This results in lighter and less oily fries that are more enjoyable to eat.
With the double-frying method, you can achieve consistent results batch after batch. By following the same process each time, you can predictably produce homemade french fries that meet your desired standards of texture, crispiness, and flavour. This level of consistency is invaluable for home cooks looking to elevate their fry game.

Seasoning Your Fries
While the classic salted french fry is always a winner, don’t be afraid to get creative with your seasonings. Experiment with different spices and herbs to create unique flavour combinations. Some popular options include garlic powder, paprika, chilli powder, or a sprinkle of grated Parmesan cheese. Toss the hot fries with your desired seasonings immediately after frying to ensure they adhere evenly.
Serving and Enjoying
Once your homemade french fries are golden brown and crispy, it’s time to serve them up and enjoy! Serve them hot and fresh out of the fryer with your favourite dipping sauces, such as ketchup, mayo, or aioli. Whether as a side dish for burgers and sandwiches or as a tasty snack on their own, these crispy fries are sure to be a hit with friends and family alike. Experiment with different seasoning blends to elevate the flavour of your fries. From classic salt and pepper to garlic powder, paprika, or even truffle salt, the possibilities are endless. Customize the seasoning to your taste preferences for a unique culinary experience.
Creative Dipping Sauces
Take your dipping sauce game to the next level by experimenting with creative flavour combinations. Consider offering unique options like sriracha aioli, chipotle mayo, or tangy barbecue sauce alongside traditional favourites. Encourage guests to mix and match sauces for a personalized dipping experience. Create a communal dining experience by serving homemade french fries on large, shareable platters or trays. This encourages interaction and conversation among diners, making the meal more enjoyable and memorable. Arrange the fries attractively on the platter, ensuring easy access for everyone.
Conclusion
Creating homemade french fries is an enjoyable and satisfying cooking task that brings tasty outcomes. By using the correct potatoes, preparing them properly, and following some helpful tips, you can make crispy, golden fries comparable to those from popular fast-food places. So, don’t hesitate! Grab some potatoes and start frying – your taste buds will appreciate it!

Ways to Make Your Own Gourmet Popcorn
In the realm of snacking, few treats hold the charm and versatility of gourmet popcorn. Elevating your popcorn game from the mundane to the extraordinary is simpler than you think. Let’s embark on a journey where we explore delightful ways to make your gourmet popcorn. Hence, transforming your snacking moments into a gourmet adventure.

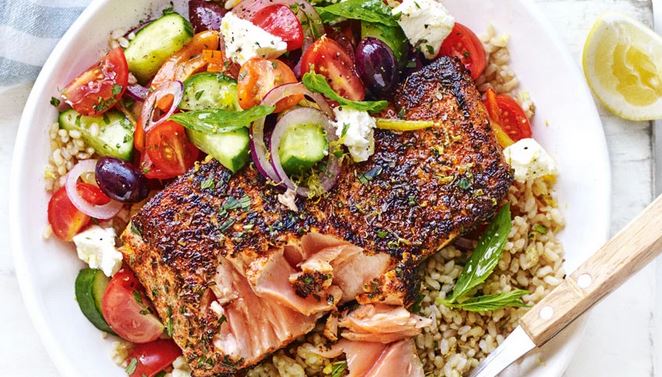
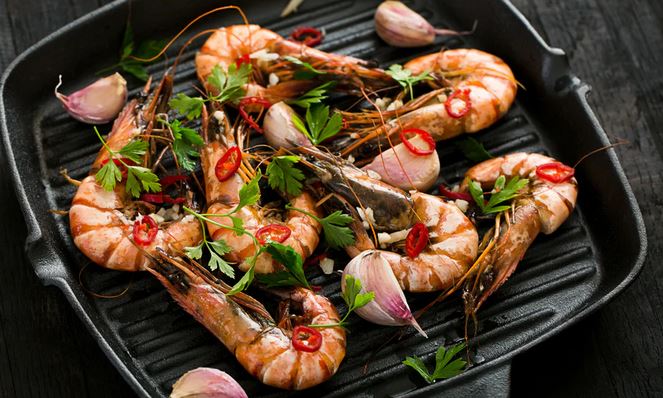
Best Ways to Cook Flavorful Seafood
Grilling seafood is a straightforward yet tantalizing approach. Place your favourite seafood, whether it’s succulent shrimp or flaky fish fillets, on a preheated grill. Drizzle with a hint of olive oil, sprinkle sea salt, and add a squeeze of lemon for a burst of freshness. In this article, we will give you ways to cook flavorful seafood.
Mastering the Art of Pan-Seared Perfection
Pan-searing seafood is a quick and versatile method. Heat a pan with a touch of butter or olive oil until it sizzles. Lay your seafood gently, allowing it to develop a golden crust. Therefore, season with salt, pepper, and a pinch of paprika for a smoky note.
Pro Tip: Achieve a crispy texture by patting the seafood dry before searing to prevent excess moisture.
Unleash the Aromas with Baked Brilliance
Baking seafood is an oven-kissed journey to flavorful perfection. Lay your seafood on a baking sheet, generously season it, and bake it until it reaches tender flakiness. Hence, enhance the aroma by adding fresh herbs like dill or thyme.
Pro Tip: Create a foil packet for each serving to lock in moisture and infuse your seafood with maximum flavour.
Steaming Simplicity: A Delicate Dance of Flavors
Steaming is a gentle method that preserves the natural sweetness of seafood. Set up a steamer with your favourite marine delicacies, and add aromatic ingredients like ginger slices and lemongrass. Therefore, let the steam weave its magic until your marine delicacies become tender.
Pro Tip: Elevate the steaming liquid by incorporating wine or marine delicacies broth for an extra layer of depth.
Stir-Frying for a Seafood Sizzle
Stir-frying marine delicacies is a fast-paced, flavour-packed affair. Heat your wok, toss in your seafood, and add vibrant vegetables. Splash in soy sauce, garlic, and a touch of honey for a savoury and slightly sweet symphony.
Pro Tip: Flash-cook marine delicacies to retain their juicy tenderness while ensuring a delightful crunch in your stir-fry.
Graced by Citrus: Citrus-Infused Ceviche Sensation
Ceviche is a refreshing marine delicacies dish where the acidity of citrus juices “cooks” the delicacies. Combine diced marine delicacies with lime and lemon juice, chopped cilantro, and a dash of salt. Therefore, allow the mixture to marinate, delivering a burst of zesty freshness with every bite.
Pro Tip: Add diced mango or pineapple for a tropical twist that balances the citrus tang.
Fragrant Curry Magic: Seafood Curry Extravaganza
Moreover, curries are an aromatic adventure for marine delicacies lovers. Simmer a medley of your favourite marine delicacies in a rich coconut milk-based curry sauce. Infuse the curry with a blend of spices like turmeric, cumin, and coriander for an explosion of flavours.
Pro Tip: Toast the spices in the pan before adding the coconut milk for intensified aroma and depth.
Poached Elegance: Seafood Poaching Perfection
In addition, poaching marine delicacies retain their delicate texture and allow for subtle flavour infusion. Gently simmer your marine delicacies in a broth made with white wine, herbs, and a touch of garlic. Poaching is ideal for more delicate options like soles or shrimp.
Pro Tip: Use a flavorful broth with aromatic vegetables to enhance the poached seafood’s taste.
Herb-Graced Butter Basting: Buttery Seafood Bliss
Furthermore, basting marine delicacies with herb-infused butter adds richness and depth. Melt butter and infuse it with herbs like thyme, rosemary, and parsley. Additionally, brush this aromatic concoction onto your seafood while cooking to create a luscious, herb-kissed masterpiece.
Pro Tip: For a hint of indulgence, mix finely minced garlic into the herb-infused butter.
Charmed by Citrus Wood Planks
Grilling marine delicacies on cedar planks imparts a subtle smokiness and citrusy flavour. Therefore, soak cedar planks in water, place your seasoned seafood on top, and let the grill work its magic. The result? A harmonious blend of woodsy and citrus notes.
Conclusion
In conclusion, the world of seafood cooking unfolds with endless possibilities. Whether you opt for the charred embrace of the grill, the delicate dance of poaching, or the aromatic richness of curry, each method adds its unique charm to your marine delicacies creations.
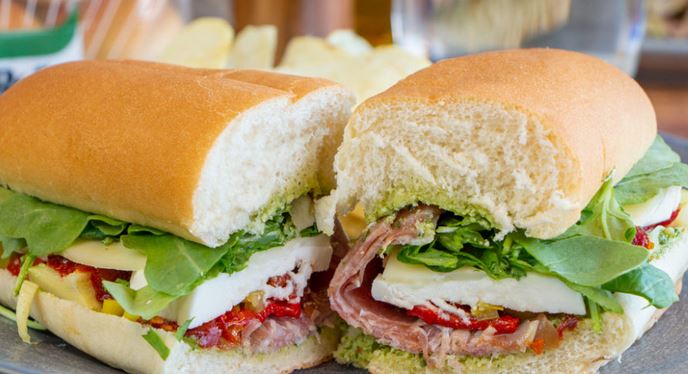
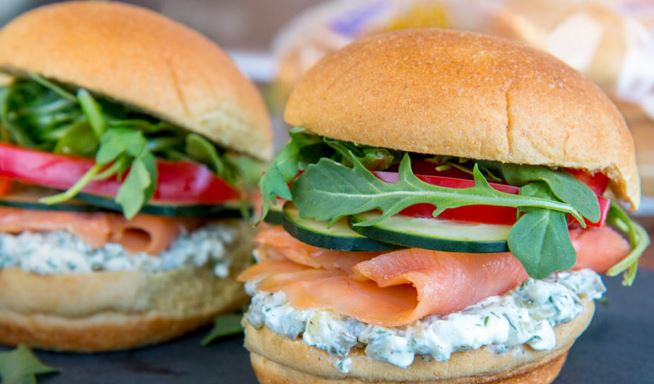
Ways to Elevate Your Homemade Sandwiches
Crafting the perfect sandwich is an art, and with a bit of creativity, you can transform this classic meal into a culinary delight. Here are some simple yet effective ways to take your sandwiches to the next level, ensuring each bite is a burst of flavour and satisfaction.
1. Fresh and Flavorful Bread Choices
Start with the foundation: your bread. Opt for fresh and artisanal options such as ciabatta, whole-grain, or sourdough. These not only add texture but also enhance the overall taste of your sandwich.
2. Build on Bold Spreads
Swap out standard mayo for exciting spreads like pesto, garlic aioli, or spicy mustard. These flavorful alternatives add a kick to your sandwich and elevate the taste profile.
3. Layer with Quality Proteins
Invest in premium meats like smoked turkey, roast beef, or grilled chicken. Quality proteins are the heart of any satisfying sandwich, providing substance and a savoury punch.
4. Add a Crunch with Fresh Veggies
Enhance the texture by incorporating crisp vegetables. Thinly sliced cucumbers, bell peppers, and radishes not only add a refreshing crunch but also contribute vibrant colours.
5. Elevate with Artisanal Cheeses
Upgrade your cheese selection to artisanal varieties. Whether it’s creamy brie, sharp cheddar, or tangy blue cheese, the right cheese can turn a good sandwich into a gourmet experience.
6. Roast or Grill for Depth of Flavor
Take an extra step by roasting or grilling your proteins and vegetables. This process enhances the natural flavours and adds a smoky depth that sets your sandwich apart.
7. Experiment with Exotic Condiments
Explore international flavours by trying exotic condiments such as tzatziki, chipotle aioli, or mango chutney. These unique additions can elevate your sandwich to a whole new taste dimension.
8. Balance with Sweet and Savory Components
Achieve a perfect balance by incorporating sweet and savoury elements. Think about adding fruits like apple slices or fig jam to complement the salty and savoury components.
9. Toast or Press for Warmth and Crunch
Take your sandwich to another level by toasting or pressing it. This not only provides a warm and comforting feel but also ensures a delightful crunch with every bite.
10. Play with Herb-infused Butters
Experiment with herb-infused butter for an extra burst of flavour. Spread a basil or garlic-infused butter on your bread for a subtle yet aromatic enhancement.
11. Infuse Flavors with Marinated Ingredients
Marinate your vegetables or proteins in flavorful concoctions. Try balsamic-marinated tomatoes or teriyaki-soaked chicken for an added layer of taste.
12. Pickle for a Tangy Twist
Add homemade pickles to your sandwich for a tangy kick. Pickled red onions, jalapeños, or even cucumbers can bring a zesty, refreshing element.
13. Incorporate Fresh Herbs for Brightness
Include a handful of fresh herbs like basil, cilantro, or mint. These herbs not only add a burst of colour but also infuse sandwiches with aromatic and bright notes.
14. Opt for Specialty Bread Rolls
Explore unique bread roll options, like pretzel rolls, focaccia, or even croissants. The bread choice can significantly impact the overall taste and texture.
15. Customize with Homemade Sauces
Experiment with crafting your sauces. Create a signature aioli, a spicy sriracha mayo, or a garlic-infused yoghurt sauce to personalize sandwiches.
16. Layer in Avocado for Creaminess
For a creamy and nutritious touch, add slices of ripe avocado. Its buttery texture complements the other ingredients and adds a healthful element.
17. Go Beyond Lettuce with Leafy Greens
Upgrade from basic lettuce to more flavorful greens like arugula, watercress, or spinach. These leafy options bring a peppery or earthy note to homemade sandwiches.
Conclusion
In conclusion, elevating your homemade sandwiches doesn’t require a culinary degree—just a dash of creativity. With these simple tips, you can turn your ordinary sandwich into a culinary masterpiece, satisfying your taste buds and leaving you craving more.
Best High-Protein Snacks for Post-Workout Recovery
Recovering after a workout is crucial for muscle repair and growth. Incorporating the right high-protein snacks into your post-exercise routine not only satisfies your hunger but also aids in replenishing energy and supporting muscle recovery. In this article, we will give you types of high-protein snacks for post-workout recovery.
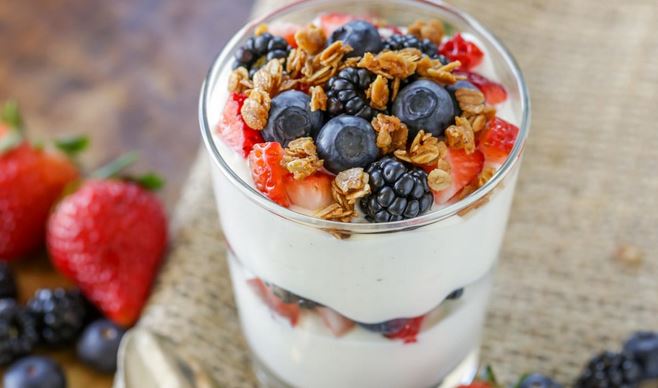
1. Greek Yogurt Parfait with Nuts and Berries
Start your recovery with a protein-packed Greek yoghurt parfait. Layer Greek yoghurt with a handful of nuts and a mix of fresh berries for a delicious and nutrient-rich snack. The combination of protein, healthy fats, and antioxidants makes it an ideal post-workout choice.
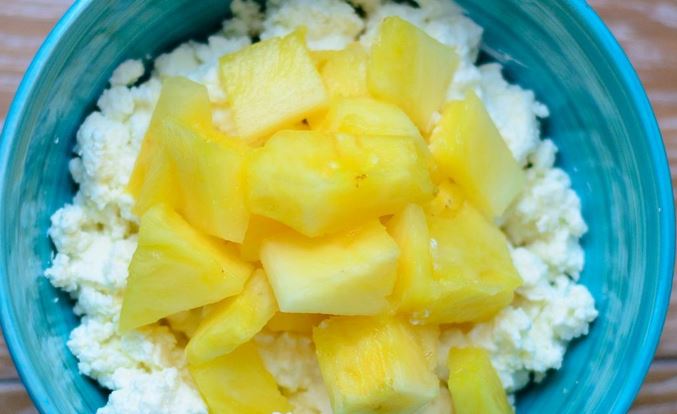
2. Cottage Cheese and Pineapple Chunks
Cottage cheese is a versatile source of protein. Pair it with pineapple chunks for a sweet and savoury post-workout snack. Cottage cheese provides a slow-release protein, while pineapple adds natural sweetness and vitamin C, aiding in muscle repair.
3. Hard-Boiled Eggs with Whole Grain Crackers
Hard-boiled eggs are a portable protein powerhouse. Combine them with whole-grain crackers for a balanced post-workout snack. The egg whites contain high-quality protein, while the crackers provide complex carbohydrates for sustained energy.
4. Almond Butter and Banana Sandwich
Spread almond butter on whole-grain bread and add banana slices for a tasty and nutritious snack. Almond butter is rich in protein and healthy fats, while bananas offer potassium and carbohydrates, assisting in replenishing glycogen stores post-exercise.
5. Protein-Packed Smoothie
Blend your favourite protein powder, a banana, a handful of spinach, and almond milk for a quick and delicious smoothie. This not only provides a convenient way to consume protein but also offers essential vitamins and minerals.
6. Turkey and Cheese Roll-Ups
Roll up lean turkey slices with your favourite cheese for a satisfying snack. Turkey is a lean source of protein, and the cheese adds flavour while contributing additional protein and calcium for bone health.
7. Quinoa Salad with Chickpeas
Quinoa is a complete protein, and when paired with chickpeas in a salad, it becomes a powerhouse of nutrients. Add colourful vegetables and a light vinaigrette for a refreshing and protein-rich post-workout option.
8. Chocolate Milk
Surprisingly effective, chocolate milk provides an ideal ratio of carbohydrates to protein, promoting muscle recovery. It’s a convenient and delicious way to refuel after a workout.
9. Protein Energy Bites
Prepare no-bake protein energy bites using ingredients like oats, peanut butter, honey, and protein powder. These bite-sized snacks offer a quick energy boost along with the protein your muscles need.
10. Grilled Chicken Skewers
Marinate chicken chunks, skewer them, and grill for a tasty protein-packed snack. Chicken is a lean source of protein, and the grilling adds a savoury touch.
11. Tuna Salad on Whole Grain Crackers
Create a quick tuna salad using canned tuna, mixed with Greek yogurt, diced vegetables, and a touch of lemon juice. Spread it on whole-grain crackers for a protein-rich, satisfying crunch.
12. Edamame Snack Bowl
Boil edamame and sprinkle them with a dash of sea salt. Edamame is rich in plant-based protein, providing a tasty alternative for post-workout recovery.
13. Smoked Salmon Wraps
Wrap smoked salmon around cream cheese and cucumber slices. This snack not only delivers protein but also omega-3 fatty acids for added joint and heart health benefits.
14. Turkey and Avocado Wrap
Create a protein-packed wrap by combining sliced turkey with creamy avocado. The turkey provides lean protein, while the avocado adds healthy fats, creating a flavorful and nutritious post-workout snack.
15. Chickpea and Veggie Hummus Plate
Make a colourful plate with hummus as the base, surrounded by fresh veggies like cherry tomatoes, cucumber slices, and bell pepper strips. Hummus, made from chickpeas, offers a combination of protein and fibre.
16. Salmon and Cream Cheese Cucumber Bites
Top cucumber slices with a dollop of cream cheese and a piece of smoked salmon. This bite-sized snack delivers a burst of protein and omega-3 fatty acids for muscle recovery and overall health.
Conclusion
Incorporating these protein snacks into your post-workout routine can significantly enhance your recovery process. Remember to stay hydrated and listen to your body’s signals. Experiment with different combinations to find what works best for you. Enjoy these tasty snacks as a rewarding part of your fitness journey.