
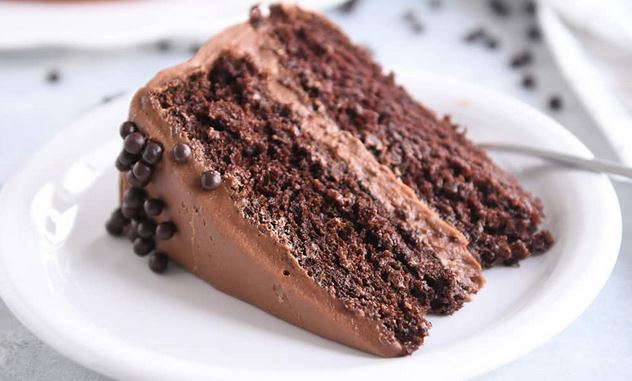
How to Bake a Decadent Chocolate Cake

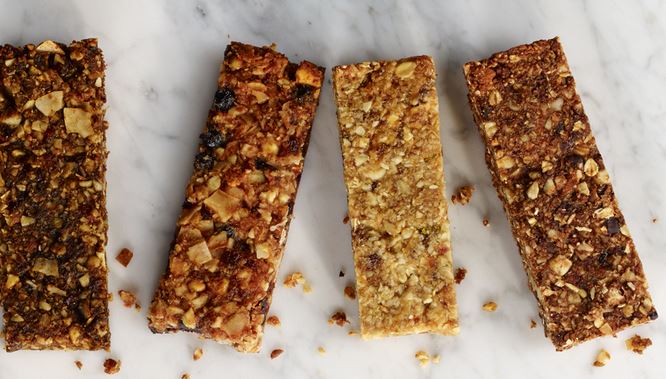
Crafting Homemade, Healthy Energy Bars


How to Properly Season and Grill Fish Fillets


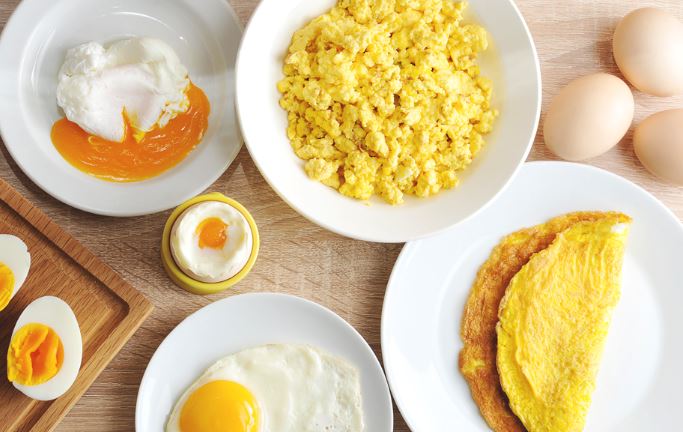
Ways to cook Eggs for Breakfast
Eggs, a breakfast staple, offer incredible versatility and nutritional benefits. In this guide, we will explore various ways to cook eggs for breakfast, ensuring you fill your mornings with delicious and satisfying options.
Scrambled Eggs with a Twist
Start your day with classic, scrambled eggs, and elevate them with creative twists.
Cheesy Herb Scramble
Whisk eggs with your favorite herbs like chives or parsley and add a generous sprinkle of cheese for a savory and comforting breakfast.
Veggie-Packed Scramble
Incorporate sautéed vegetables like bell peppers, spinach, and tomatoes for a colourful and nutrient-rich scrambled egg medley.
Mexican-Inspired Scramble
Infuse a South-of-the-Border flair by adding salsa, black beans, and a touch of cumin to your scrambled eggs. Top with avocado for extra creaminess.
Sunny-Side Up and Over Easy
Master the art of cooking eggs with runny yolks for a deliciously indulgent breakfast.
Classic Sunny-Side Up
Serve over toast for a traditional and straightforward option.
Avocado Nest Eggs
Create a nest using sliced avocado halves and cook your eggs in the centre. The combination of creamy avocado and runny yolk is simply irresistible.
Eggs Benedict Perfection
Top English muffins with poached eggs, Canadian bacon, and hollandaise sauce for a decadent and restaurant-worthy breakfast.
Poached Eggs Mastery
Poaching eggs can be a bit tricky, but the results are worth it. Explore these options for a perfectly poached breakfast.
Classic Eggs Florentine
Poach eggs and serve them over sautéed spinach and an English muffin. Drizzle with hollandaise sauce for a sophisticated start to your day.
Tomato Basil Poached Eggs
Poach eggs in tomato and basil-infused water for a burst of fresh flavours. Serve on whole-grain toast for a wholesome meal.
Smoked Salmon Eggs Benedict
Elevate your poached eggs with smoked salmon, adding a luxurious touch to the classic Eggs Benedict.
Curried Coconut Milk Poached Eggs
Poach eggs in a simmering mixture of coconut milk and curry spices for a luscious and fragrant breakfast that will transport you to tropical realms.
Bacon-Wrapped Asparagus Eggs Benedict
Revamp the classic eggs Benedict by swapping the traditional English muffin for bacon-wrapped asparagus spears. A delightful twist on a brunch favourite.
The Versatility of Omelettes
Omelettes are a canvas for creativity. Customize them with your favourite ingredients for a hearty and fulfilling breakfast.
Mushroom and Spinach Omelette
Sauté mushrooms and spinach before folding them into your omelette. Top with feta cheese for a gourmet touch.
Caprese Omelette
Tomatoes, fresh mozzarella, and basil come together in this Italian-inspired omelette. Drizzle with balsamic glaze for an extra kick.
Baked and Boiled Brilliance
Baked Spinach and Artichoke Egg Cups
Blend the classic spinach and artichoke dip flavours into baked egg cups for a delightful and portion-controlled breakfast.
Mexican-Style Soft-Boiled Eggs
Soft-boil eggs and serve them Mexican-style with a dollop of guacamole and a sprinkle of chilli powder.
Baked Eggs in Avocado Halves
Scoop out some of the avocado flesh, crack an egg into the hollow, and bake for a creamy and nutritious breakfast that’s as Instagram-worthy as it is delicious.
Mushroom and Swiss Baked Egg Cups
Bake eggs in a savoury mix of sautéed mushrooms and Swiss cheese for a sophisticated and flavorful breakfast in convenient cup form.
Green Goddess Soft-Boiled Eggs
Soft-boil eggs and serve them with a vibrant green goddess dressing made with avocado, herbs, and a hint of lemon for a refreshing morning treat.
Baked Eggs in Bell Pepper Rings
Create a colourful breakfast by baking eggs within bell pepper rings, topped with your favourite herbs and spices for a visually appealing and tasty dish.
Conclusion
With these exciting ways to cook eggs for breakfast, you can add variety and flavour to your morning routine. Whether you prefer the simplicity of scrambled eggs or the elegance of eggs Benedict, there’s a delicious egg dish for every palate. Experiment with these recipes, and discover new favorites that will make your breakfasts both enjoyable and nutritious.

Ways to Whip Up a Quick Omelette

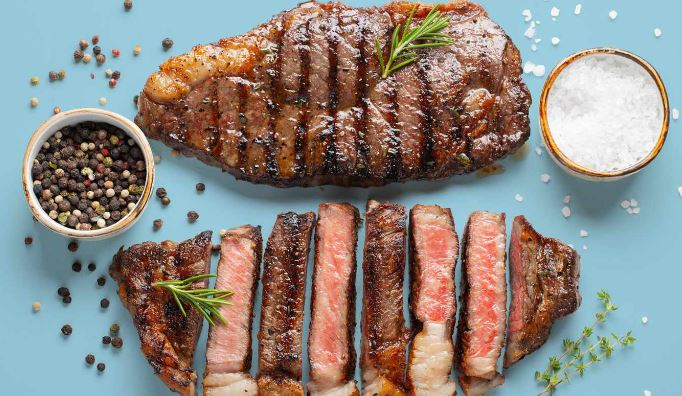
Ways to Grill the Perfect Steak
Whether you’re a novice in the kitchen or a seasoned home cook, this guide will take you through the steps to achieve a mouthwatering steak on the grill. From selecting the right cut to mastering the cooking techniques, let’s dive into the world of steak grilling.

Choosing the Right Cut
The foundation of a perfect grilled steak starts with choosing the right cut of meat. Popular choices for grilling include ribeye, sirloin, and T-bone steaks. Each cut offers a unique balance of tenderness and flavour. If you’re unsure, don’t hesitate to ask your local butcher for recommendations based on your preferences.
Preparing the Steak
Before firing up the grill, it’s essential to prepare the steak properly. Take the steak out of the refrigerator at least 30 minutes before cooking to allow it to reach room temperature. Pat it dry with paper towels to remove excess moisture, which can inhibit the formation of a delicious crust during grilling.
Seasoning
Seasoning is key to enhancing the flavour of your steak. Keep it simple with a classic combination of salt and pepper, or experiment with your favourite steak rubs and marinades.
Preheating the Grill
Achieving the perfect sear requires a preheated grill. Heat your grill to medium-high, ensuring the grates are clean and well-oiled to prevent sticking.
Grilling Techniques
Place the seasoned steak on the preheated grill and sear each side for a few minutes to lock in the juices. For a medium-rare steak, aim for an internal temperature of 130-135°F (54-57°C). Use a meat thermometer to gauge doneness accurately.
Let it Rest
Once the steak reaches your desired doneness, resist the urge to cut into it immediately. Allow the steak to rest for about 5-10 minutes to redistribute the juices. This crucial step ensures a juicy and flavorful eating experience.
Serving and Enjoying
Slice the beef against the grain to maximize tenderness. Pair it with your favourite sides, whether it’s a fresh salad, grilled vegetables, or a classic baked potato. The result: a perfect grilled steak that’s tender, flavorful, and sure to impress your taste buds.
Marinating Options
Experiment with different marinades to infuse additional flavours into your beef. Classic options include a mix of olive oil, garlic, herbs, and a splash of acidic elements like balsamic vinegar or citrus juice.
Wood Chips for Flavor
If you’re using a charcoal grill, consider adding soaked wood chips to impart a smoky flavour to your steak. Mesquite, hickory, and oak are popular choices.
Reverse Searing Technique
Try the reverse searing method by slow-cooking the steak at a lower temperature before finishing it with a high-heat sear. This technique ensures a more even internal doneness.
Herb Butter Basting
Elevate the flavour by basting your steak with herb-infused butter during the grilling process. This adds a rich and aromatic layer to the final product.
Resting in Style
Enhance the resting process by tenting the beef loosely with foil. This helps retain heat while allowing excess moisture to escape, contributing to a crispier crust.
Grilled Citrus Garnish
Grill slices of citrus fruits like lemons or oranges alongside your steak. Squeeze the grilled citrus over the beef before serving for a zesty twist.
Temperature Zones
Create different temperature zones on your grill – a hot zone for searing and a cooler zone for finishing. This allows you to control the cooking process more precisely.
Experiment with Rubs
Explore various dry rubs containing spices, herbs, and even coffee grounds for a unique flavour profile. Ensure the rub complements the natural taste of the beef.
Accompanying Sauces
Prepare simple yet flavorful sauces to serve with your beef. A chimichurri or a red wine reduction can add an extra layer of taste.
Grilled Desserts
Extend your grilling experience by preparing a simple dessert like grilled peaches or pineapple. The residual heat from the grill can work wonders with fruits.
Conclusion
In conclusion, grilling the perfect steak is a rewarding culinary skill that anyone can master. By choosing the right cut, preparing the steak with care, and following simple grilling techniques, you’ll be on your way to enjoying restaurant-quality beef in the comfort of your backyard. So, fire up the grill and savour the deliciousness of

Best Ways to Cook Hearty Winter Stews


How to Build the Ultimate DIY Burger Bar
Are you ready to elevate your burger experience? Creating a DIY burger bar is a fun and interactive way to bring everyone together for a delicious meal. Follow these simple steps to set up the ultimate DIY burger bar without any fuss.

1. Gather Fresh Ingredients
Start with the basics – high-quality ground beef, buns, and fresh produce. Choose an assortment of veggies like crisp lettuce, juicy tomatoes, crunchy pickles, and thinly sliced onions. Don’t forget the cheese options, from classic cheddar to tangy blue.
2. Grill or Cook Patties
Fire up the grill or stovetop to cook the burger patties. Season the ground beef with salt and pepper for a classic taste, or get creative with your favourite spices. Cook the patties to your preferred level of doneness, ensuring a juicy and flavorful bite.
3. Provide Diverse Bun Options
Offer a variety of bun choices to cater to different tastes. Classic sesame seed buns, whole wheat buns, or even lettuce wraps for a low-carb option. Ensure they’re fresh and soft to enhance the burger experience.
4. Condiments Galore
Set up a condiment station with an array of sauces and spreads. Ketchup, mustard, mayonnaise, and BBQ sauce are essentials. Consider adding special touches like sriracha mayo, aioli, or tangy relishes for added flavour.
5. Fresh Greens and Toppings
Include a selection of fresh greens such as arugula or spinach. Provide various toppings like crispy bacon, sautéed mushrooms, and avocado slices for those looking to customize their burgers further.
6. Assorted Cheese Choices
Cheese is a crucial element of any burger. Offer a mix of cheeses like Swiss, pepper jack, and feta. Don’t forget a vegan cheese option for those with dietary preferences.
7. Sides and Snacks
Complement the burgers with an assortment of sides and snacks. Classic options include crispy fries, onion rings, or a fresh salad. Consider healthier alternatives like vegetable sticks with hummus or baked sweet potato wedges.
8. Beverages for All Tastes
Quench everyone’s thirst with a variety of beverage options. Provide soft drinks, sparkling water, or craft sodas. For adults, you can include a selection of beers or create non-alcoholic mocktails.
9. DIY Burger Bar Presentation
Set up the burger bar in an organized and visually appealing way. Arrange ingredients in separate containers with labels for easy identification. Consider using rustic wooden boards or colorful platters to enhance the presentation.
10. Encourage Creativity
The beauty of a DIY burger bar lies in customization. Encourage your guests to get creative with their combinations. Display recipe cards with suggested burger builds or let them invent their own flavorful masterpieces.
11. Signature Sauces
Introduce unique, signature sauces that add a special touch to the burgers. Consider options like truffle aioli, mango habanero sauce, or tzatziki for a Mediterranean twist. These exclusive sauces can elevate the flavour profile of the burgers.
12. Exotic Protein Choices
Go beyond traditional beef patties and offer exotic protein alternatives. Include options like turkey, chicken, or even plant-based patties for guests with different dietary preferences. This adds variety and ensures everyone has a tasty option.
13. Ethnic Flavors
Incorporate ethnic flavours to diversify the burger bar experience. Include ingredients like kimchi, guacamole, tzatziki, or harissa to provide a global touch. This allows guests to experiment with flavours from around the world.
14. Collaborative Challenges
Introduce collaborative challenges where participants can team up to spin the wheel collectively. This fosters a sense of teamwork and encourages social interaction in the virtual space. The shared experience adds an extra layer of enjoyment to the event.
Conclusion
A DIY burger bar is a fantastic way to turn a simple meal into a memorable experience. Whether hosting a family gathering or a casual get-together with friends, everyone will enjoy the freedom to build their perfect burger. Keep it simple, fresh, and fun, and you’re sure to have a hit on your hands. Get ready for a burger extravaganza that caters to every palate!