

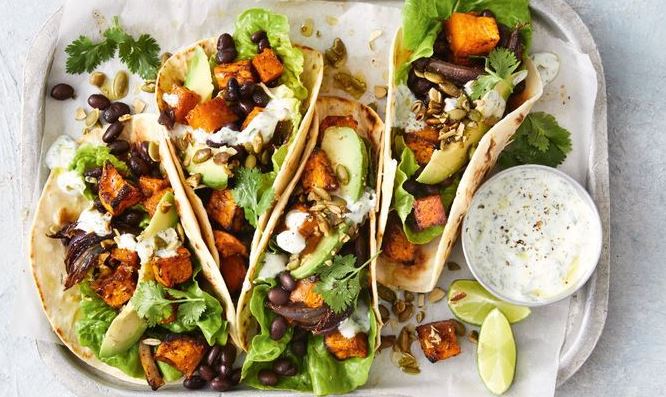
How to Cook Delicious Vegetarian Tacos
Vegetarian tacos offer a vibrant and flavorful twist to traditional taco recipes, making them a delightful choice for meat lovers and plant-based enthusiasts alike. In this step-by-step guide, we’ll explore the art of creating mouthwatering vegetarian tacos that are not only easy to prepare but also bursting with delicious, plant-powered goodness. Let’s dive into the world of colourful ingredients, bold flavours, and a culinary adventure that will elevate your taco game.
Choose Fresh and Vibrant Ingredients
The foundation of any delectable vegetarian taco lies in the freshness of your ingredients. Opt for a colourful array of vegetables such as bell peppers, tomatoes, avocados, onions, and crisp lettuce. Fresh produce not only enhances the flavour but also adds a visual appeal to your taco creation.
Protein Powerhouse: Incorporate Plant-Based Proteins
Elevate the nutritional content of your vegetarian tacos by incorporating plant-based proteins. Consider options like black beans, pinto beans, lentils, or tofu seasoned with a blend of savoury spices. These protein-packed fillings not only add substance but also contribute to the satisfying texture of your tacos.
Master the Art of Seasoning
The key to flavorful vegetarian tacos is mastering the art of seasoning. Create a robust seasoning mix using a combination of cumin, chilli powder, garlic powder, smoked paprika, and a pinch of cayenne for a subtle kick. This aromatic blend will infuse your ingredients with a savoury depth that mimics traditional taco seasonings.
Tortilla Selection
Whether you prefer corn or flour tortillas, the choice is yours. Corn tortillas provide a rustic, authentic flavour, while flour tortillas offer a soft and flexible texture. Warm them slightly on a griddle or in the oven before assembling them to enhance their pliability and aroma.
Fresh Guacamole for Creaminess
Elevate the creaminess of your vegetarian tacos with a generous dollop of fresh guacamole. Mashed avocados, diced tomatoes, onions, cilantro, lime juice, and a pinch of salt create a luscious and zesty topping that complements the bold flavours of the fillings.
Salsa Fresca for a Burst of Freshness
A vibrant salsa fresca adds a burst of freshness to your tacos. Dice ripe tomatoes, red onions, jalapeños, and cilantro. Combine with lime juice and salt for a zesty salsa that balances the richness of the fillings. Adjust the spice level to suit your preference.
Crisp Shredded Lettuce for Texture
Shredded lettuce contributes a crisp texture to your tacos, enhancing the overall mouthfeel. Choose fresh iceberg or romaine lettuce and shred it finely. Layer it on top of your fillings for a refreshing and satisfying crunch with every bite.
Cheese – Go Beyond the Basics
Experiment with a variety of cheeses to add a savoury and melty component to your vegetarian tacos. Opt for classics like shredded cheddar or Monterey Jack, or try crumbly cotija for a distinctive Mexican flavour. Don’t forget to sprinkle it generously over your warm fillings for the perfect melt.
Assembly: Layer with Precision
When assembling your vegetarian tacos, layering is key. Start with a generous spoonful of your protein filling, followed by cheese, fresh guacamole, salsa fresca, and finally, the crisp shredded lettuce. This layering technique ensures that each bite is a harmonious blend of textures and flavours.
Garnish with Fresh Cilantro and Lime
Elevate the presentation and flavour of your vegetarian tacos by garnishing them with fresh cilantro leaves and a squeeze of lime. These finishing touches add a burst of citrusy brightness and a hint of herbal freshness to your culinary creation.
Customize to Your Taste
The beauty of vegetarian tacos lies in their versatility. Feel free to customize the toppings and fillings based on your preferences. Add pickled jalapeños, sour cream, or even a drizzle of hot sauce for an extra kick.
Conclusion
Cooking delicious vegetarian tacos is a culinary adventure that celebrates the richness of plant-based ingredients. With fresh produce, protein-packed fillings, and a symphony of bold flavours, these tacos are a testament to the fact that a meat-free meal can be just as satisfying and indulgent. Elevate your taco game, embrace creativity in the kitchen, and treat yourself to the joy of crafting and devouring these mouthwatering vegetarian delights.

How to Bake Perfectly Moist Chocolate Chip Cookies
Embarking on a culinary journey to bake the perfect chocolate chip cookies is a delightful endeavour that promises sweet rewards. In this guide, we’ll dive into the art and science of crafting irresistibly moist chocolate chip cookies that will leave your taste buds dancing. From selecting the finest ingredients to mastering the baking process, follow these expert tips to elevate your cookie game.

Quality Ingredients Matter
The foundation of any outstanding chocolate chip cookie lies in the quality of its ingredients. Opt for fresh, high-quality butter, all-purpose flour, and, of course, premium chocolate chips. The better the ingredients, the more delightful your cookies will be.
Butter: The Heart of Moisture
Butter plays a pivotal role in achieving moist chocolate chip cookies. Creaming the butter with sugars creates an airy texture, contributing to the perfect cookie consistency.
The Right Sugar Balance
Achieving the ideal sweetness requires a balance between brown and white sugars. Brown sugar adds moisture and a hint of caramel flavour, while white sugar provides structure and sweetness. Combine both sugars for a harmonious blend that enhances the overall cookie experience.
Eggs: Binding Magic
Eggs act as binders, holding the cookie dough together. For moist chocolate chip cookies, use large eggs at room temperature.
Vanilla Extract: Flavor Elevation
Enhance the flavour profile of your cookies with a splash of high-quality vanilla extract. This subtle addition complements the sweetness and adds depth, creating a more nuanced and enjoyable cookie experience.
Flour: Measure with Precision
Accurate flour measurement is critical. Too much flour can lead to dry cookies. Use the spoon-and-level method to measure flour, ensuring you don’t pack it into the measuring cup. Alternatively, use a kitchen scale for precise measurements.
Baking Soda and Salt: Leavening and Balance
Baking soda acts as a leavening agent, contributing to the cookies’ rise and texture. Include a pinch of salt to balance the sweetness and enhance the overall flavour profile. Be mindful not to overdo it; a little goes a long way.
Premium Chocolate Chips: Elevate the Experience
The star of the show is chocolate chips. Choose high-quality chocolate chips or chunks for a decadent touch. Whether semi-sweet, dark, or a combination, the richness of premium chocolate enhances the overall cookie experience.
Perfectly Shaped Cookies: Consistency is Key
Use a cookie scoop or a tablespoon to ensure uniform cookie sizes. This promotes even baking and guarantees a consistent texture across your batch. Arrange the dough on a parchment-lined baking sheet, leaving enough space for the cookies to spread.
Bake with Precision: Timing Matters
Preheat your oven for consistent results. Bake the cookies at the specified temperature, usually around 350°F (175°C). Keep a watchful eye, and once the edges turn golden brown, it’s time to remove them. Overbaking can result in dry cookies, so precision is key.
Cooling for Chewiness
Allow your cookies to cool on the baking sheet for a few minutes before transferring them to a wire rack. This brief cooling period contributes to a chewier texture, ensuring the cookies remain moist and delectable.
Experiment with Mix-Ins: Personalize Your Batch
While chocolate chips are a classic choice, don’t shy away from experimenting with mix-ins like chopped nuts, dried fruits, or even a sprinkle of sea salt on top. These additions add layers of flavour and texture to your cookies.
Store with Care: Maintain Freshness
To preserve the moisture in your chocolate chip cookies, store them in an airtight container at room temperature. Adding a slice of bread can also help retain moisture, ensuring your cookies stay fresh for an extended period.
Conclusion
In conclusion, baking perfectly moist chocolate chip cookies is a delightful blend of precision, quality ingredients, and a dash of patience. By mastering each step of the process—from ingredient selection to baking and beyond—you’ll create a batch of cookies that captivates with its texture, and flavour. Elevate your baking prowess and treat yourself to the joy of savouring homemade chocolate chip perfection.
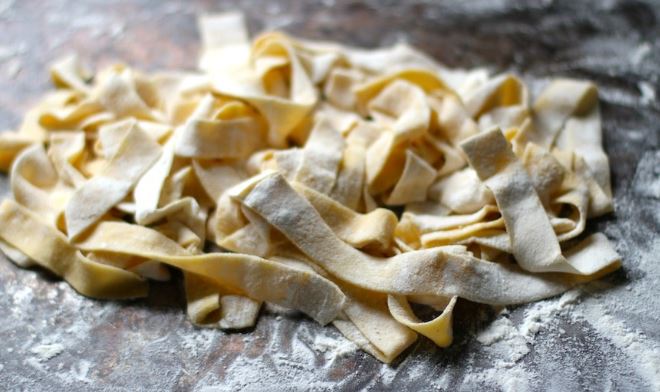
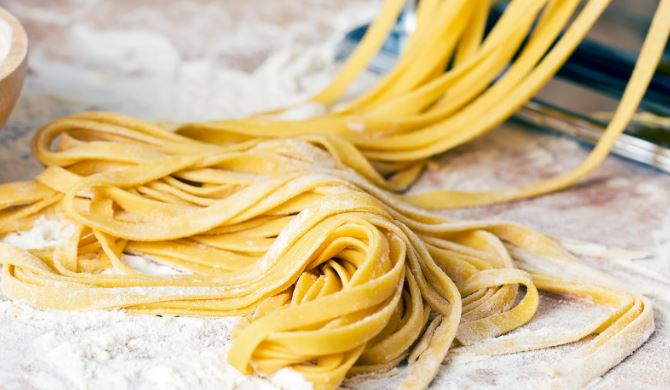
The Art of Making Fresh Pasta
In the realm of culinary craftsmanship, few skills rival the satisfaction and artistry involved in making fresh pasta. Far beyond the convenience of store-bought varieties, crafting your pasta from scratch allows you to engage with the process, ensuring a connection to the ingredients and a depth of flavour that is unparalleled. Join us on a culinary journey as we explore the timeless tradition and step-by-step process of mastering the art of making fresh pasta.
The Significance of Fresh Pasta
Fresh pasta holds a special place in the hearts of chefs and home cooks alike. Its tender texture, delicate flavour, and versatility make it a canvas for countless culinary creations. While dried pasta has its place, the act of creating pasta dough from basic ingredients allows for a profound connection to the culinary heritage, turning a simple meal into a work of edible art.
Ingredients for Basic Fresh Pasta Dough:
- 2 cups all-purpose flour
- 3 large eggs
- Pinch of salt
Instructions
Form a Flour Mound
On a clean surface or in a large mixing bowl, mound the flour, creating a well in the centre.
Crack the Eggs
Crack the eggs into the well, ensuring they remain within the flour boundaries.
Incorporate the Ingredients
With a fork or your hands, gradually incorporate the flour into the eggs until a shaggy dough forms.
Knead the Dough
Turn the dough out onto a floured surface and knead for about 8-10 minutes until it becomes smooth and elastic. This step is crucial for developing the gluten structure.
Rest the Dough
Wrap the pasta dough in plastic wrap and let it rest for at least 30 minutes. This allows the gluten to relax, making the dough easier to roll out.
Roll and Shape
After resting, roll out the pasta dough using a pasta machine or a rolling pin. Shape it into your desired pasta form, whether it be tagliatelle, fettuccine, or ravioli.
Cooking Time
Fresh pasta cooks much faster than dried pasta. Boil in salted water for 2-4 minutes, depending on the thickness of your pasta.
The Artistic Touch
Making fresh pasta goes beyond the basic steps—it’s about adding your artistic touch. Experiment with incorporating spinach for vibrant green pasta, beetroot for a rich hue, or squid ink for a striking black colour. Explore various shapes and sizes, letting your creativity flow as you transform a simple dough into a visually appealing masterpiece.
Pairing with Sauces
Fresh pasta deserves a sauce that complements its delicate nature. From classic marinara to brown butter and sage or a light lemon-infused olive oil, the choice of sauce can enhance the flavour of your handmade pasta. Experiment with different pairings to discover the perfect harmony.
Flour Varieties:
Experiment with different types of flour to diversify the flavour and texture of your fresh pasta. While all-purpose flour is a classic choice, consider using semolina for a heartier texture or 00 flour for a silkier finish.
Herb and Spice Infusions:
Elevate the flavour profile of your fresh pasta by infusing the dough with herbs or spices. Incorporate finely chopped fresh herbs like basil, parsley, or thyme into the dough for an aromatic twist. Alternatively, add a pinch of ground spices like garlic powder, turmeric, or black pepper for a unique flavour kick.
Coloured Pasta Creations:
Play with natural ingredients to add vibrant colours to your pasta dough. Spinach, beetroot, carrot, and squid ink are excellent choices for creating visually stunning and flavorful pasta. These additions not only bring a pop of colour to your plate but also introduce additional nutrients and subtle tastes.
Conclusion
As you embark on the art of making fresh pasta, relish the simplicity and satisfaction that comes from crafting a dish from basic ingredients. Whether you are a seasoned chef or a novice in the kitchen, the process of making fresh pasta allows for creativity, connection, and, most importantly, a delightful dining experience. Elevate your meals by mastering the art of fresh pasta. And savour the satisfaction of creating a culinary masterpiece in your kitchen.
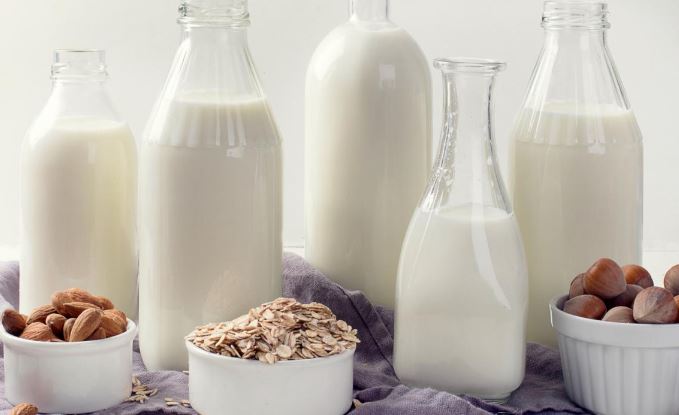
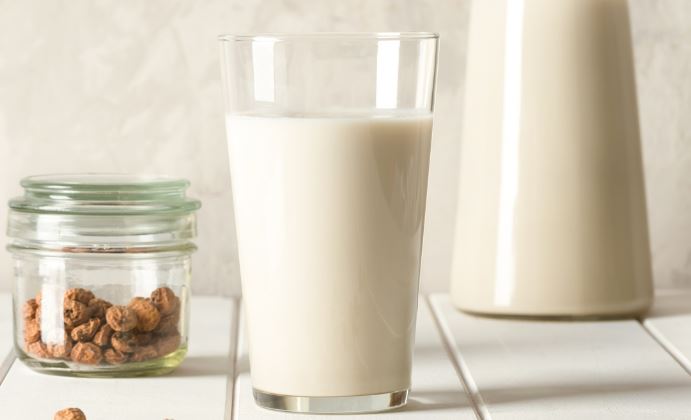
Homemade Nut Milk and Dairy Alternatives

How to Cook a Spicy Chicken Curry
Are you ready to infuse your kitchen with tantalizing aromas and bold flavours? Let’s dive into the exciting world of cooking a spicy chicken curry. Follow these simple steps to create a mouthwatering dish that will satisfy your spice cravings.

Ingredients You’ll Need
- Chicken pieces (bone-in for added flavour)
- Cooking oil
- Onions, finely chopped
- Garlic cloves, minced
- Ginger, grated
- Tomatoes, chopped
- Green chillies, sliced
- Curry powder
- Ground turmeric
- Ground cumin
- Ground coriander
- Red chilli powder (adjust to taste for spice level)
- Garam masala
- Salt to taste
- Fresh cilantro for garnish
Steps to Spicy Chicken Curry Perfection
1. Sear the Chicken
In a hot pan with oil, sear the chicken pieces until they develop a golden-brown crust. This step locks in the juices and adds depth to the flavour.
2. Saute Onions, Garlic, and Ginger
In the same pan, sauté finely chopped onions until golden. Add minced garlic and grated ginger, stirring until aromatic. This forms the flavorful base of the curry.
3. Introduce Tomatoes and Green Chilies
Incorporate chopped tomatoes and sliced green chillies into the mix. Cook until the tomatoes break down and the mixture becomes a fragrant, thick paste.
4. Spice it Up
Sprinkle curry powder, ground turmeric, ground cumin, ground coriander, and red chilli powder over the mixture. Stir to coat the ingredients, letting the spices bloom and infuse their essence.
5. Add Chicken and Simmer
Add water to create a luscious gravy. Allow the curry to simmer, letting the chicken absorb the flavours.
6. Garam Masala Magic
Stir in garam masala for that final burst of aromatic goodness. This spice blend elevates the curry to another level, enhancing both fragrance and taste.
7. Season to Perfection
Taste and adjust salt and spice levels as needed. Remember, the key to a great curry lies in balancing the flavours to suit your preferences.
8. Garnish with Cilantro
Just before serving, sprinkle fresh cilantro over the curry. This adds a burst of freshness and a visually appealing touch.
9. Serve and Enjoy
Pair it with steamed rice, naan, or your favourite bread to experience the full spectrum of flavours.
Pro Tips for Culinary Success
Control the Spice
Adjust the amount of red chilli powder based on your spice tolerance. Feel free to experiment with different chilli varieties for varied heat levels.
Marinate for Intensity
For an even more flavorful curry, marinate the chicken in yoghurt and spices for a few hours or overnight before cooking.
Coconut Milk Twist
For a creamy variation, add coconut milk to the curry while simmering. This brings a rich, velvety texture to the dish.
Controlled Heat Levels
Adjust the amount of red chilli powder based on your spice tolerance. For those who prefer milder flavours, reduce the quantity, or for spice enthusiasts, feel free to experiment with different chilli varieties for varied heat levels.
Marination Magic
For an even more flavorful curry, consider marinating the chicken in a mixture of yoghurt, ginger, garlic, and spices for a few hours or even overnight. This step not only adds depth to the taste but also tenderizes the chicken, making it more succulent.
Aromatic Whole Spices
Introduce whole spices like cardamom, cloves, and cinnamon during the cooking process. These aromatic additions infuse the curry with nuanced flavours, creating a symphony of tastes that dance on your palate.
Tomato Paste Trick
For a richer colour and concentrated tomato flavour, add a tablespoon of tomato paste along with fresh tomatoes. This imparts depth to the curry and complements the other spices.
Now that you’ve mastered the art of cooking spicy chicken curry, delight your taste buds with this aromatic creation. Spice up your culinary repertoire and enjoy the warmth and richness of this classic dish!

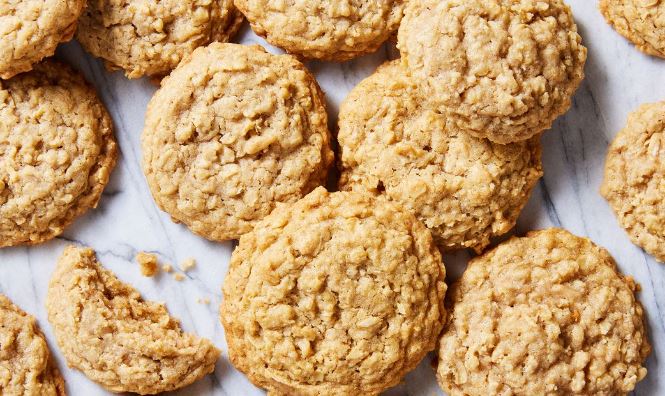
How to Make Homemade Oatmeal Cookies
Are you ready to embark on a delightful journey of baking? In this quick and easy guide, we’ll show you how to make scrumptious oatmeal cookies right in the comfort of your kitchen. Let’s dive into the simple steps for a batch of homemade goodness!
Ingredients You’ll Need
- Rolled oats
- All-purpose flour
- Unsalted butter
- Brown sugar
- Granulated sugar
- Eggs
- Vanilla extract
- Baking soda
- Cinnamon
- Salt
- Optional add-ins: chocolate chips, raisins, or chopped nuts
Steps to Oatmeal Cookie Perfection
1. Preheat Your Oven
Preheat your oven to 350°F (175°C). This ensures the cookies bake evenly to golden perfection.
2. Gather Your Ingredients
Assemble all your ingredients on the counter. Having everything ready makes the process smoother.
3. Cream Butter and Sugars
In a mixing bowl, cream softened butter, brown sugar, and granulated sugar until light and fluffy. This forms the base of your delicious oatmeal cookies.
4. Add Eggs and Vanilla
Mix in the vanilla extract, infusing a rich flavour into your cookie dough.
5. Combine Dry Ingredients
In a separate bowl, whisk together rolled oats, all-purpose flour, baking soda, cinnamon, and a pinch of salt. This dry mixture adds the perfect texture and flavour to your cookies.
6. Incorporate Dry Mixture
Gradually add the dry mixture to the wet ingredients. Mix until just combined. Be cautious not to overmix; a tender cookie texture awaits!
7. Optional Add-Ins
Enhance your oatmeal cookies by folding in your choice of add-ins. Whether it’s chocolate chips, raisins, or chopped nuts, this step adds delightful surprises to every bite.
8. Scoop and Space
Using a cookie scoop or a spoon, drop rounded dough portions onto a parchment-lined baking sheet. Remember to leave enough space between each cookie for spreading during baking.
9. Bake to Perfection
Pop your cookie-laden baking sheet into the preheated oven. Bake for 10-12 minutes or until the edges turn golden brown. The aroma of freshly baked cookies will fill your kitchen!
10. Cool and Enjoy
Once baked to perfection, transfer the cookies to a wire rack to cool. Exercise patience as they firm up during this crucial phase. Then, indulge in the sweet rewards of your baking endeavour.
11. Flour Alternatives
Experiment with flour alternatives such as whole wheat flour or almond flour for a unique twist on your oatmeal cookies. These variations can introduce different flavours and nutritional benefits.
12. Chilling the Dough
Consider chilling the dough for at least 30 minutes before baking for thicker and chewier cookies. This helps solidify the fats in the dough, resulting in a richer texture.
13. Flavor Infusions
Elevate the flavour profile by infusing the butter with spices like nutmeg or cardamom. Melt the butter with these spices and let it cool before creaming it with sugars.
14. Sea Salt Finish
Sprinkle a pinch of sea salt on top of each cookie just before baking. The subtle saltiness enhances the sweetness and adds a gourmet touch.
15. Size Consistency
Maintain consistent cookie sizes to ensure even baking. Using a cookie scoop or measuring spoon helps achieve uniformity, resulting in a cohesive batch.
16. Dual Flour Combination
Blend different flours for a nuanced flavour. Try a mix of all-purpose flour and oat flour for a delightful fusion that accentuates the oats in your cookies.
17. Freshly Grated Nutmeg
Grate nutmeg directly into the dough for an aromatic and warm undertone. Freshly grated nutmeg provides a more intense flavour compared to pre-ground versions.
18. Brown Butter Magic
Take your cookies to the next level by using brown butter. Melt butter until it turns a deep golden brown, imparting a nutty flavour to your oatmeal cookies.
19. Decorate with Drizzles
After baking, add a finishing touch by drizzling melted chocolate or a simple glaze over the cooled cookies. This not only enhances flavour but also adds visual appeal.
20. Healthier Sweeteners
Explore alternative sweeteners like honey or maple syrup for a healthier option. Adjust the quantity accordingly and enjoy a different depth of sweet
There you have it! With these simple steps, you’ve mastered the art of baking homemade oatmeal cookies. Now, share these delectable treats with loved ones or savour them all to yourself. Happy baking!

Hot Dog Toppings: A Culinary Adventure

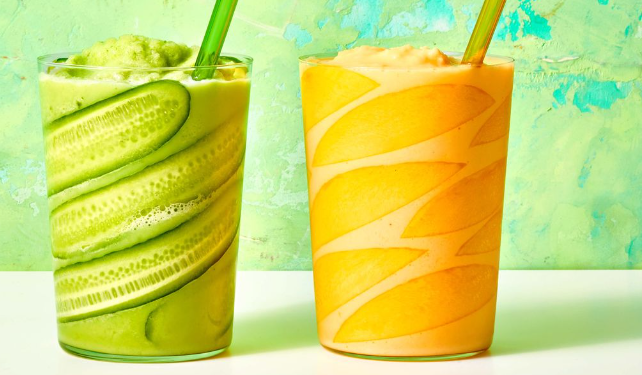
Smoothie Combos for Vibrant Living
In the realm of health and vitality, few things rival the goodness of a well-crafted smoothie. Beyond a mere beverage, it’s a fusion of flavours and nutrients that promises not only a delightful experience for your taste buds but also a wealth of benefits for your well-being. Join us on an exploration of these healthy smoothie combos, each designed to elevate your everyday living.
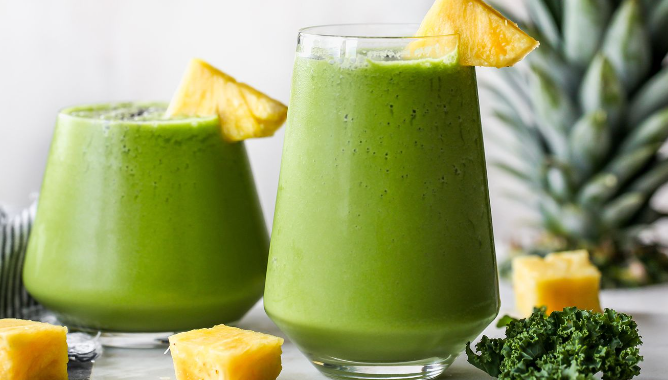
Embracing the Green Goddess: A Verdant Symphony
The Green Goddess smoothie is a testament to the marriage of health and flavour. Spinach and kale, rich in vitamins and minerals, dance harmoniously with the tropical sweetness of pineapple and banana. The addition of almond milk not only lends a creamy texture but also infuses the elixir with a host of benefits, promoting detoxification and offering a refreshing burst of energy.
Indulging in Berry Bliss: A Symphony of Antioxidants
Berry Bliss is a celebration of vibrant colours and robust flavours. A medley of mixed berries, coupled with creamy Greek yoghurt, provides not only a delightful explosion of taste but also a powerful combination of antioxidants, fibre, and probiotics. This blend supports digestion, enhances heart health, and satisfies sweet cravings in a guilt-free manner.
Tropical Paradise: Sunshine in a Glass
Escape to a Tropical Paradise with this vibrant blend of mango, pineapple, coconut water, and orange juice. Packed with vitamin C and electrolytes, this concoction not only boosts immunity but also hydrates your body, offering a momentary reprieve in a sun-soaked haven with every sip.
Power Up with Protein: A Nutrient-Rich Kickstart
The Protein Powerhouse is another one of the healthy smoothie combo. It is a fusion of banana, peanut butter, protein powder, and almond milk. Beyond delivering natural sweetness and nutty richness, this blend provides a substantial source of protein and healthy fats. It’s a perfect choice to power up your day, aiding muscle recovery, keeping you satiated, and ensuring sustained energy.
Citrus Splash: A Zesty Wake-Up Call
Citrus Splash is a burst of sunshine, blending oranges, pineapple, Greek yoghurt, and water. Rich in vitamin C, fibre, and probiotics, this combination enhances digestion, supports skin health, and invigorates your senses, providing a refreshing and vitamin-packed start to your day.
Choco-Banana Indulgence: Guilt-Free Chocolate Decadence
Indulge in the decadence of Choco-Banana, a guilt-free treat combining banana, cacao powder, almond butter, and almond milk. Packed with antioxidants, potassium, and healthy fats, this smoothie satisfies sweet cravings while promoting heart health. Hence, offering a delightful and nourishing chocolate experience.
Experiment with different nut butter like hazelnut or cashew for a unique flavour profile in your Choco-Banana Indulgence.
Detox Elixir: A Refreshing Cleanse
The Detox Elixir is a refreshing cleanse with cucumber, celery, lemon, mint leaves, and coconut water. Hydrating and alkalizing, this combination supports detoxification, aids digestion and leaves you feeling rejuvenated—a perfect choice for those seeking a revitalizing experience.
Add a handful of fresh parsley or cilantro to the Detox Elixir for added detoxifying benefits and a burst of fresh flavour.
Ginger Spice Refresher
Kickstart your metabolism with the Ginger Spice Refresher, blending pineapple, ginger, turmeric, and carrot juice. Pineapple and carrot juice deliver vitamins, while ginger and turmeric bring anti-inflammatory properties. Hence, making this combination a metabolism-boosting powerhouse that not only tastes good but also supports your overall well-being.
Freeze pineapple juice into ice cubes and use them in the Ginger Spice Refresher for a chilled and refreshing twist.
Conclusion
As you traverse the world of healthy smoothie combinations, remember that each sip contributes to a symphony of nutrients tailored for your well-being. So, savour the symphony, embrace the flavours, and let the nutrient-rich bliss of these smoothies become your daily ritual towards a healthier, more vibrant life.